


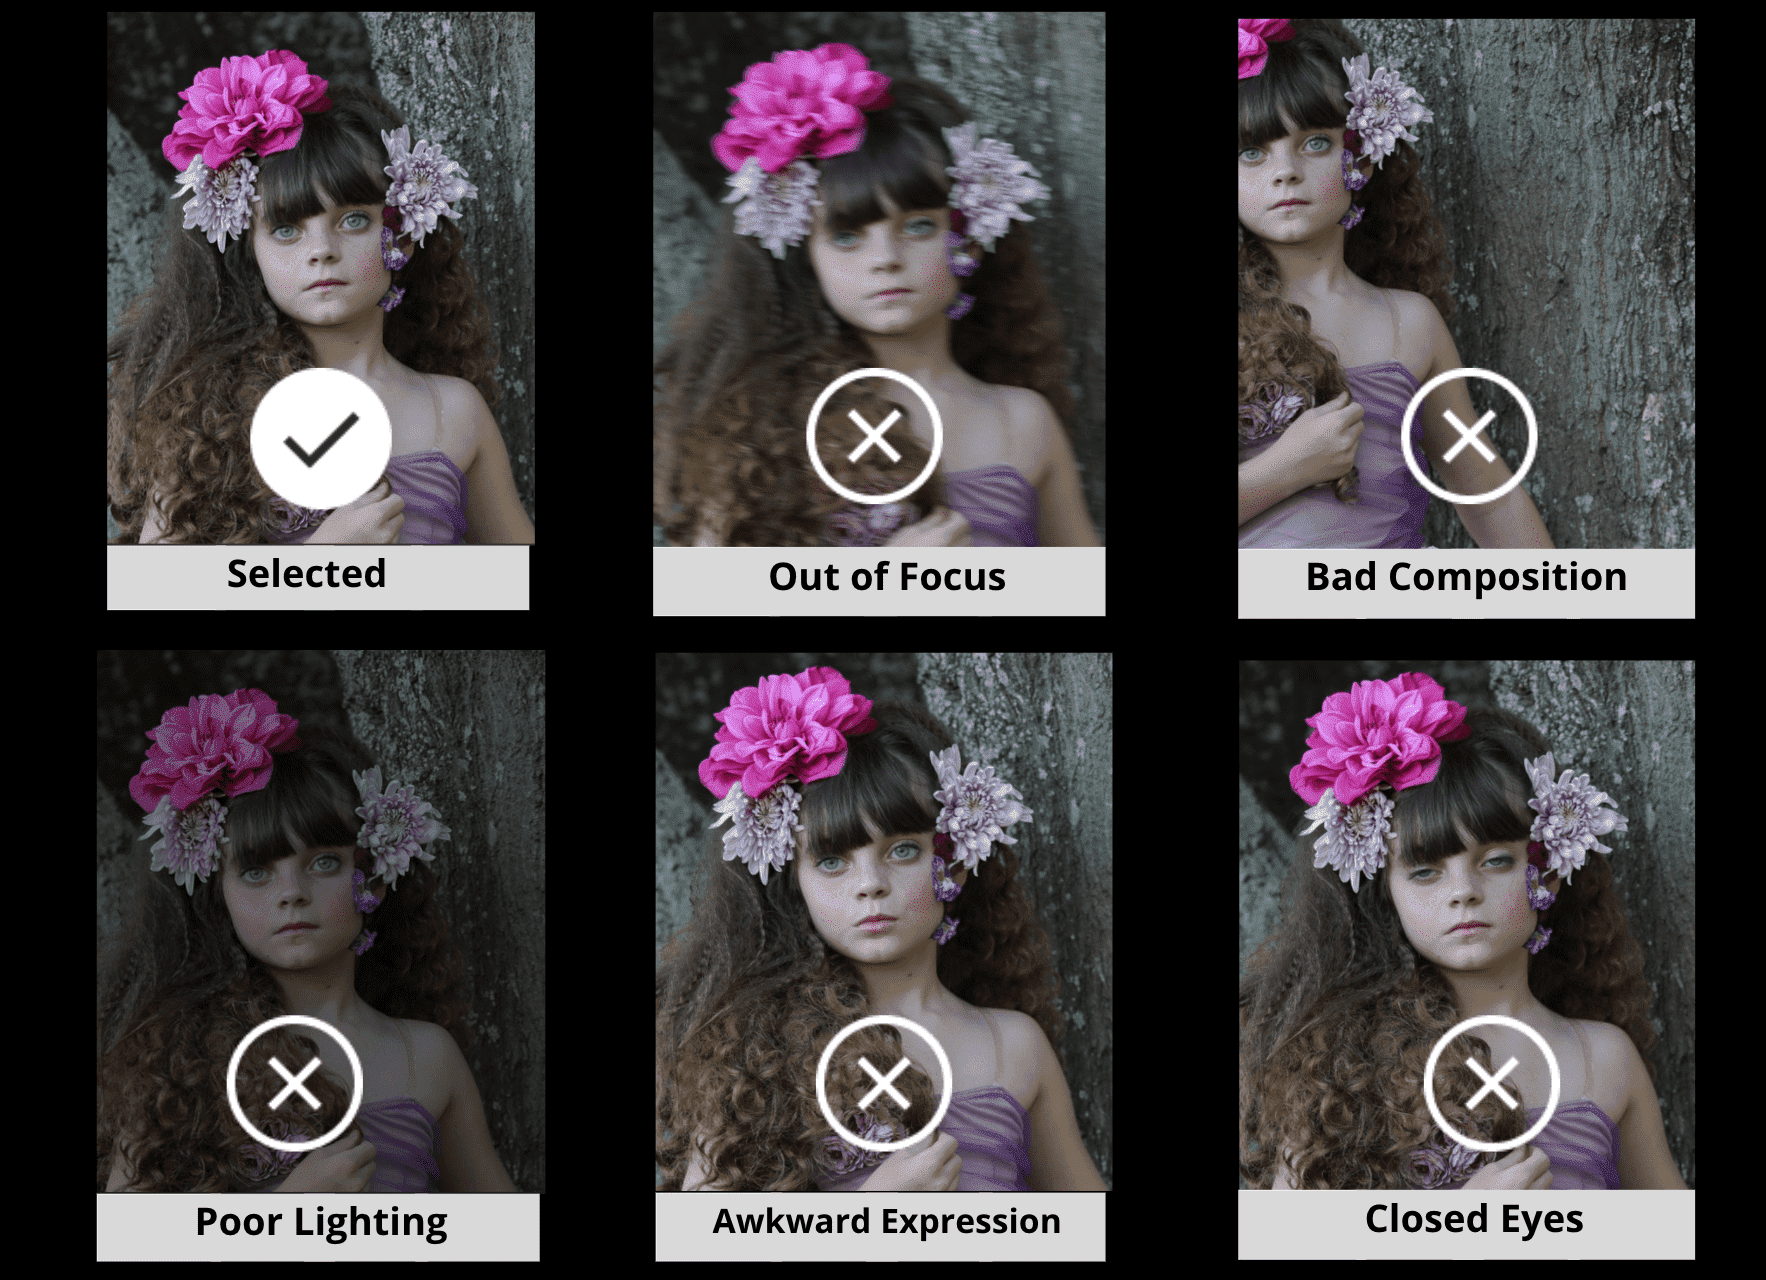
Culling is a necessary process for photographers. It helps get rid of duplicates, foul shots with blinking eyes, awkward poses, or blurry images, and of course, it saves a lot of time during the editing process.
Learning how to cull and properly do it is an important skill to develop as a photographer.
Shot thousands of photos?
FilterPixel culls them in minutes using genre-specific AI. Try DeepCull free.
With the rise of AI photo-culling software, photographers have begun transitioning to the use of this new technology.
However, AI photo culling calls for a photographer to learn the fundamentals of choosing the right images to keep and delete and navigating through an AI photo culling software.
This article will discuss both the fundamentals of photo culling and how to properly utilize AI photo culling software.
Fundamentals of Photo Culling
Be Objective/Don’t Be Emotional
One of the most common things both amateur and professional photographers suffer from is the reluctance to delete photos.
Some of them tend to be emotional when deleting some images that they’ve taken even though they have straightforward and blatant flaws that are impossible to cover in the editing process, or some have separation issues with their images.
This is even painfully more common among beginners that need to treasure all the photos that they take.
For all photographers, only about one-tenth in a hundred photos they take are worth taking the time to edit and show to people.
Additionally, it’s important to note that if you don’t delete a lot of your images, you’ll end up filling your memory with a lot of junk images that won’t see the day of light ever again.
Therefore, to become a great photographer, it’s essential to strive for quality over quantity on any given day.
Focus on Good Photos, Not Bad Ones
Don’t bother about the slightly blurry image you’ve taken or that photo that you didn’t quite capture what you wanted.
Instead, focus on that image that looks amazing, captures what you want, and would vastly improve if you were to edit it. This is a fundamental philosophy to embrace for photographers.
Picking the photos you want and focusing on the positive makes it easier for you to select a picture out of the endless sea of images in your memory card. It’s also worth mentioning that this will make it easier for you.
Fixating the photos with flaws will result in photographers focusing on their mistakes and not the good shots they’ve taken.
Lastly, it would be a nightmare if you were to delete images you don’t like until there’s the only one left and you find out you don’t want any of the photos left behind.
Don’t Rush
It might not make sense for this to remain fundamental for photo culling, especially with AI photo culling, where hundreds of images can be processed in seconds. This tip still stands.
Even if you have the help of Artificial Intelligence, rushing the process is never a good idea.
Instead, with the extra minutes or even hours you’ve gotten from utilizing an AI photo software like FilterPixel that saves time- you have more time to be creative.
How To Use An AI Photo Culling Software
For this part, we’ll be using FilterPixel, one of the most convenient AI Photo culling software available in the market, as an example.
Like all AI photo culling software out there, it uses Artificial Intelligence to help eliminate bad or mediocre photos and supplements the culling process with intelligent features.
Import
Beginning the process is simple. Instead of uploading or exporting your images on a software that you’d usually use, like Lightroom, to cull your photos, you’ll be importing your RAW files or JPEGs directly into the FilterPixel software generating instant previews.
To start culling images on FilterPixel, begin a project by clicking on the “+” icon.

After clicking the icon, you can drag/drop your folder and name the project.

Once a project is created, your previews will be available in real-time after importing your RAW or JPEG files.
Automate
FilterPixel will automatically filter out blurry, out-of-focus photos for you in the first step.
You can look for relatively good images.

The process from here is simple. Here is what you should ask yourself:
How much control do I need over my final selections in this shoot?
Option 1: I want complete control over my selections
Go through Unrated Section & Select your favorites manually
The AI has tagged all bad images as rejected; you can manually go through the good photos inside the Unrated section.
Click the Unrated Icon as shown in the above image > And Press P to select any image.
For the entire keyboard shortcuts, check this guide
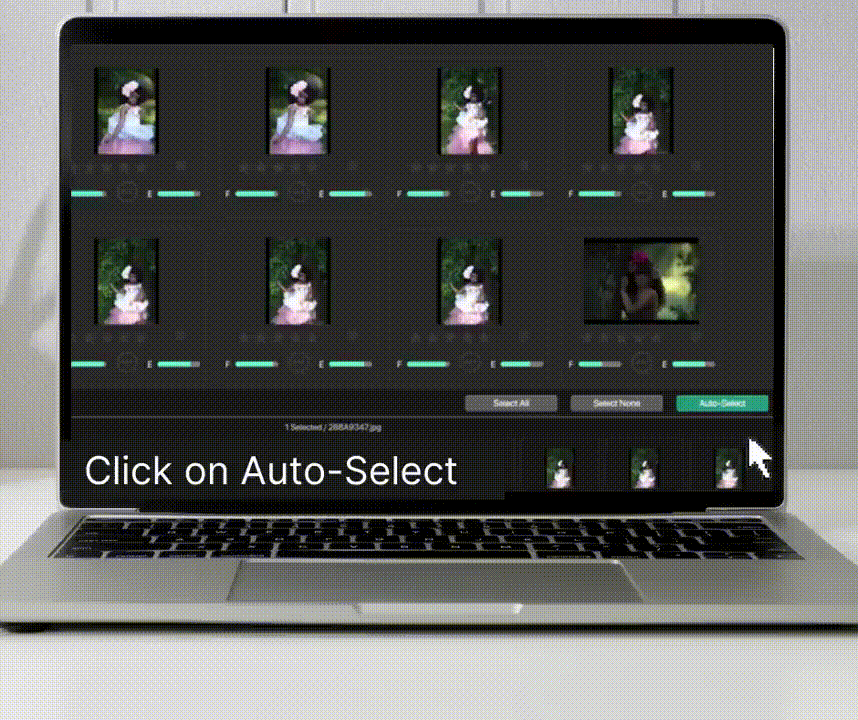
Option 2: I don’t want to control; let the AI select the best for me
Click on AutoSelect as shown below and let the AI choose the best ones for you out from every similar set of photos.
Now, review & finalize your selections.
Tip: AutoSelect never misses the best photo as it picks at least one from each group.
Export
Export your final selections to your hard drive or Lightroom in a single click.
Tip: Taking only selected photos to Lightroom creates fewer bulky catalogs in lightroom and saves space.
Hope you have liked this post.
If you have not tried FilterPixel yet, you can try it for free.
-1.png)
-2.png)