


We have been actively interviewing professional photographers to learn about their culling for the past year. Today, we want to share the results of more than 2000 photographers around the world who have shared their photo culling tips.
This post will discuss the questions that we have asked photographers around culling.
Shot thousands of photos?
FilterPixel culls them in minutes using genre-specific AI. Try DeepCull free.
Culling photos or Photo Culling is the process of selecting the best pictures from many photos that photographers shoot during an event or a session.
Wedding Photographers generally spend 11% of their time just culling photos which accounts for 250+ hours per year. Therefore, the faster you are, the more profitable your business.

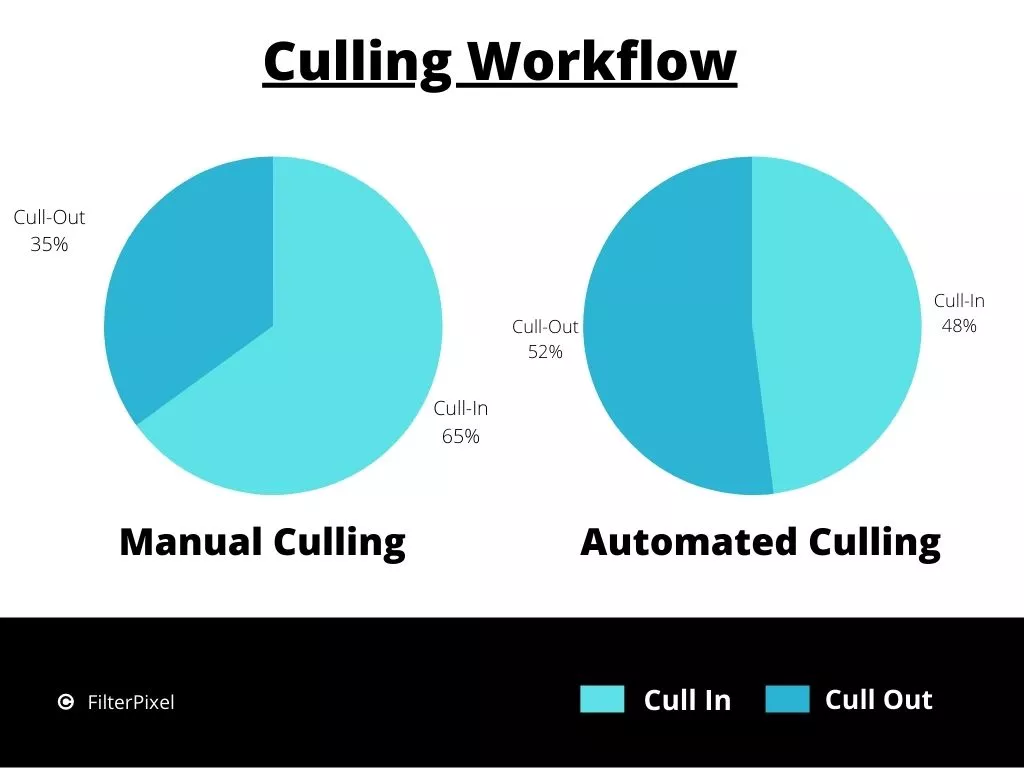
Cull-In vs. Cull-Out Culling
Most professional photographers gave one standard tip around doing the culling process. There are two significant ways to do culling: Cull-In or additive culling and Cull-Out or subtractive culling.
During Cull-In, photographers go through all the photographs, keep stars on the image they want to keep and call them keepers. While in cull-out, they discard all the ideas they don’t want instead of picking the best ones.
Manual vs. AI Culling
Many photographers do the Manual Culling, which means going through all of the photos manually one by one and deciding which one to edit. In contrast, others have adopted AI Culling, an automated way to cull their images.
How do you cull your photos?
When we asked this question to photographers who were culling photos manually, approximately 65% of them favored the cull-in approach to saving time.
As a tip, If you are culling more than 50% of your images, it’s better to follow additive culling or Cull-in. That means you are doing less work; it’s more effective and faster.
While the results were quite balanced for photographers using the AI-Culling approach, 52% favored subtractive culling or Cull-out when using AI to cull their photos.
How many passes should you make during culling?
For most photographers, one to two-pass is sufficient. At the same time, the entire purpose is trying to limit the number of images in the first pass. Therefore, going through the photos quickly and selecting the photos for one specific purpose saves a lot of time.
Photographers who use AI do only one pass. First, the AI Culling in softwares like FilterPixel tags the out-of-focus & closed eyes as reject. Then, they select from the remaining or let the AI select the best ones and reject whatever they don’t want from the AI-selected ones.
How do you decide what to keep during culling photos?
All of them want to keep just their best shots, and hence it’s essential to get rid of any motion blur or less sharp images, closed eyes, or any other undesired clicks. In terms of what to keep into the story, they have unique art and style from their gut instincts.
What software do you use to cull your photos?
In all the interviews, it was so clear that Adobe Lightroom is the hub of the wedding event photography industry. While generating previews in Lightroom is slightly slower, most favor lightroom over any other software.
A software called PhotoMechanic is also used and is an add-on to productivity. PhotoMechanic is designed explicitly for culling.
The AI Culling Softwares are used by most event & wedding photographers.
The software still needs to be faster. But, again, it depends on your machine and the type of software you use.
How do you mark your selected photos?
Many photographers use a star rating system while others add the flags inside the lightroom with a keyboard shortcut. While all of them vary a bit in terms of their rating values, some mark all of their culled images as one star during the first pass, while others believe in keeping a rating of 5. One exciting tip was this:
While culling in different passes, make sure you make decisions only based on one thing at a time, either yes or no. Either you are trying to select all one stars or two stars in a pass but don’t try to multitask.
How to become faster in culling?
There is no way to become faster in culling without measuring your last performance. Some professionals used a timer to measure their performance per 20-30 minutes session. You can also check the timing difference when you cull it after the shoot or when you cull it after procrastinating for so long.
As you progress further, you can increase speed by practicing more and more and trying different tools and methodologies. But if you cull the images just after clicking them, you will be much faster in the process.
But you can become faster at culling with the AI-based culling software.
Where and when to cull?
You can quickly determine when you will be the most effective by trying different times. In addition, fewer distractions can help in speeding up the process.
How long do you cull for?
We had many different answers varied from 20 minutes smaller sessions to an hour-long session. A typical pattern was to take adequate breaks and refresh yourself to enhance productivity.
Short sprints are better than long marathons!
Conclusion
You can also follow these quick tips to have a faster photo editing workflow. While we believe everybody is different and can have another way of culling, there are some common patterns that the best photographers are following to save their time.
We tried to summarise all of our culling tips in this post.
Filterpixel saves your time by automatically culling your photos.
If you are interested, you can signup to get it for free.
-Jun-19-2026-12-08-11-9138-PM.png)
-2.png)