


How do you organize your photo library at a time when it has become so easy to take countless photos a day?
It’s quite expected that everyone’s hard drives and devices are piled with thousands of images. Digital albums end up cluttered, disorganized, and ultimately overwhelming. This just makes the whole task of organizing seem unachievable.
Shot thousands of photos?
FilterPixel culls them in minutes using genre-specific AI. Try DeepCull free.
Professional photographers may feel an even greater burden when it comes to managing their libraries. With the pressures of managing the business, updating portfolios, and ensuring that clients are satisfied with their work, they need all the help they can get in order to handle all of these tasks efficiently.
It all starts with a structured photo library.
In this article, we’ll dive into how to organize your photo library, the most efficient way possible. We will be introducing the best tools to use and provide tips on proper photo management moving forward. First, it’s essential to understand the importance of an organized photo library.
Why do you need an organized photo library?

Sorting your image library may sound like a mundane task. However, this is actually a fundamental step in the post-production process. It sets the stage for the rest of your workflow– through culling, editing, and client submission or display.
Ensuring that your files are stored properly, in a systematic way, is a fundamental key to your success. Here’s why:
- Convenient Access
With proper categorization, you can easily locate images as you need them. Whether you’re looking for a specific photo for a client or simply thought of sharing past snaps with your family, you won’t have to scroll through a sea of photos just to find what you need.
- Easy to Back Up
Accidents happen, even with the latest gadgets and storage devices. To avoid losing years of work and memories, it’s always important to have a backup system in place. An organized photo library makes backing up images more efficient as they are sorted according to your pre-specified categories.
- Curate Albums Better
Professionals understand the value of compiling their most valuable shots. But, even amateur photographers and hobbyists will find it essential to curate personal photo libraries when shoots become more frequent. Eliminating duplicates and low-quality images ensures that your collections are curated with only the best shots from each set.
What is the best way to organize photos?

There are different methods on how you can manage your photo library. The benefit is that you can freely choose the strategy that works best for your niche or personal preference.
Here are the three most common ways to organize your photo library:
- By Date
This is the most popular way of organizing photos because cameras and smartphones sort images according to dates by default. For wedding and event photographers, this could be the most ideal method because their shoots are typically identified by dates. To make it even more specific, you may also create subfolders to further categorize the photos in each date. For example, in a wedding folder, you can have subcategories for the ceremony, the reception, and the after-party.
- By Location
Travel photographers and enthusiasts will find this technique most appropriate for categorizing their photo libraries. The latest cameras and smartphones now have automatic GPS tagging. Such technology makes it easier to identify and sort photos according to the locations where they were taken. If you have an entire album for a certain country, you can create subfolders under it for particular cities. That way, you can further categorize and filter images, making your library more organized.
- By Subject
Portrait photographers may find that sorting images by subject is the most logical way to go. For example, you’ve taken multiple photos of each employee in a single company. It would be more organized to sort each employee’s photos in one folder each, with their names as the labels. This way, if the client asks for a specific person’s photos, you can easily locate them.
Now that you have an idea of the different ways to organize your photo library, let’s go through the step-by-step process on how you can apply your chosen method.
How to organize your photo library efficiently

These steps are applicable to any of the three sorting techniques we have discussed above.
Step 1: Collect and Back Up All Your Photos
The first and most crucial step is to gather all your photos from various devices and locations. These photos may be scattered across your smartphone, camera, computer, external hard drives, and cloud storage. Consolidate everything into one central location– ideally the device which you’re planning to use for post-processing. Then, create a backup of all the images. It’s important to have a fallback in case of any technical issues during the consolidation process.
Step 2: Create a Folder Structure
The next step is to establish a clear and organized folder structure. This structure will serve as the backbone of your photo library, making it easy to find specific photos in the future. Choose among the three methods of categorization and create folders accordingly.
Remember that your folder structure should make sense to you. It should align with how you naturally categorize and recall your photos. Don’t hesitate to combine methods as you see fit or change what doesn’t work for you.
Step 3: Delete Unnecessary Photos
Unnecessary photos can consume valuable storage space and make your library more challenging to navigate. As you sort the photos in different folders, you can also start purging those that don’t hold value. This may include duplicates, blurry and overexposed shots, or photos that no longer have any use.
There are a couple of ways to do this:
- Use AI-Powered Photo Culling Tools – Several software tools are designed to identify and remove not just duplicates, but also photos that do not pass basic photography quality standards. An AI-driven culling software can help you accomplish this step in the process much faster and with higher accuracy.
- Manual Check – If you prefer a more hands-on approach, you can manually sift through your photos, compare them visually to identify and delete those that you no longer need or want to keep.
Step 4: Rename Your Photos
Renaming your photos can be an essential step to make them more meaningful and searchable. Many cameras generate file names with alphanumeric codes, making it challenging to identify photos without opening them.
To do this more efficiently, look into your operating system’s batch rename option. Simply select multiple photos that you’d like to rename, right-click, and tap on the “Rename” option. This will allow you to label the images according to your preferences.
Renaming photos is a bit time-consuming, but it will pay off in the long run when you’re searching for specific images.
Step 5: Tag Your Photos
Tags are a powerful tool for organizing your photos, especially when you have a vast library. They enable you to assign keywords or labels to photos, making it easy to search for specific images. By tagging your photos, you can create a powerful and dynamic search system within your photo library.
Step 6: Use Photo Management Software
Consider using AI-powered photo culling software that offer various features, such as facial recognition, automatic tagging, and powerful search capabilities. They can significantly streamline the organization and retrieval of your photos. Photo culling software simplifies the organization process and enhances your ability to locate photos quickly.
Step 7: Regular Maintenance
Organizing your photo library is not a one-time task; it’s an ongoing process. To keep your library efficient, follow these maintenance practices:
- Regularly Delete Unwanted Photos – As time goes by, you’ll accumulate more photos. Regularly review your library to remove photos you no longer need or want.
- Backup Your Library – Ensure your backups are up to date and functioning correctly.
- Keep Folders Up to Date – Continue organizing new photos according to your existing folder structure and naming conventions.
Organizing your photo library efficiently might initially seem like a daunting task, but the long-term benefits are immeasurable. With the right tools, you can simplify the process and easily maintain a structured photo library.
Ready to simplify how you organize your photos?
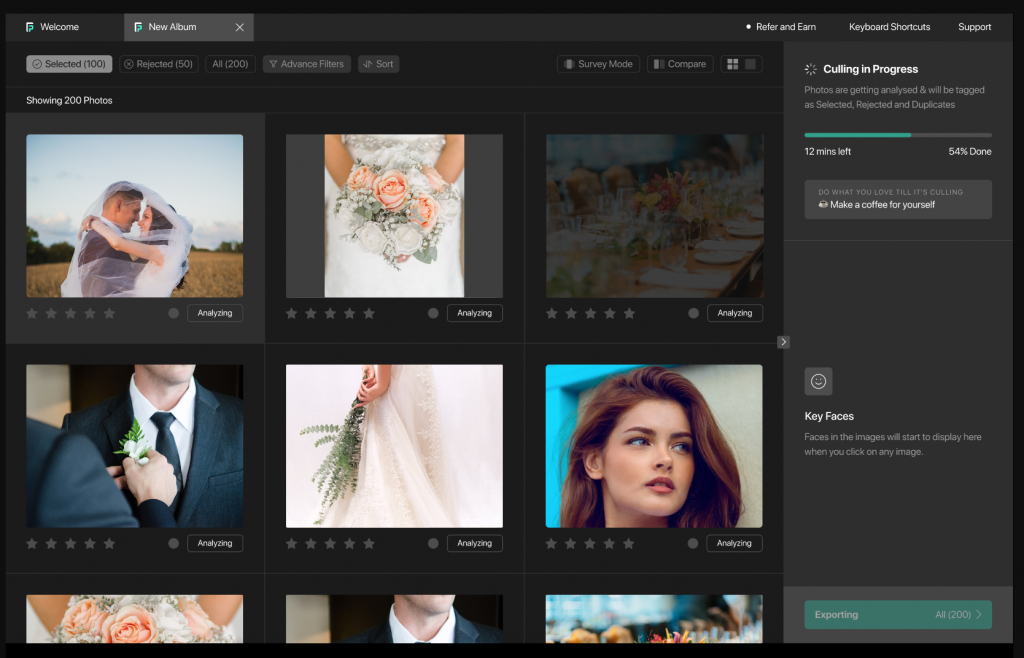
FilterPixel is a game-changing solution that is set to transform the way you organize and post-process your images by harnessing the power of AI. From the fundamental stages of importing and sorting photos, to the more technical areas of culling and editing, FilterPixel provides you with a smarter and easier way to go through all of these phases in producing top-quality images. Its remarkable ability to shorten the culling process by 80% and its highly customizable controls empower photographers of all levels of expertise to streamline their processes while maintaining total creative reign over their images.
Learn more about what we offer: https://filterpixel.com/
-Jun-19-2026-12-08-11-9138-PM.png)
-2.png)