


Introduction: Photo Culling Reimagined
Every photographer knows the dreaded post-shoot hustle: scouring through hundreds, if not thousands, of images to separate the "keepers" from the "tossers." This labor-intensive process is called photo culling, and while it might look straightforward, it’s often the biggest time sink in a photographer’s workflow.
But what if you could slash your culling time by 50–80% without sacrificing creative control? This guide unveils the secrets to faster, smarter culling—culminating in a breakthrough tool called FilterPixel that can transform your post-shoot routine. Whether you’re an established wedding pro or a newcomer in the photography world, get ready to discover advanced insights and practical tips.
Shot thousands of photos?
FilterPixel culls them in minutes using genre-specific AI. Try DeepCull free.


Defining Photo Culling: More Than Just Trimming Shots
Photo Culling involves selecting your best images from a large batch by removing duplicates, blurry frames, underexposed shots, or unflattering expressions. Far from being "busywork," culling is a critical creative process that ensures only the strongest images make it to your final gallery. Think of it as refining a marble sculpture—removing excess to reveal hidden masterpieces.
Key Elements of Photo Culling
- Volume Reduction: Sifting through 2,000+ shots to a refined 500 or fewer.
- Quality Assurance: Quickly discarding poor exposures, awkward poses, or duplicates.
- Speed & Consistency: AI-driven software can handle repetitive tasks, letting you focus on moments that matter.
Did you know? Research shows that wedding photographers spend roughly 6.5% of their time culling and 45% editing. Minimizing that culling burden frees up hours for client communication, marketing, or perfecting your craft.
The Manual Approach: A Mixed Blessing
The traditional method involves importing photos into a manual culling software (like Lightroom or Photo Mechanic), then painstakingly reviewing each frame. There’s an undeniable satisfaction in seeing every shot, but also a looming risk of fatigue, missed details, and inconsistent decision-making—especially as your eyes glaze over after the thousandth photo.
The Downsides of Manual Culling
- Slower Turnaround: Scanning thousands of images can easily steal hours from your editing schedule.
- Risk of Oversight: When you’re tired, you might discard an unexpectedly great moment—or keep an unremarkable one.
- Burnout Factor: Repetitive clicking and zooming can rapidly drain your creativity.
Despite these challenges, many photographers cling to a purely manual process, fearing they’ll lose creative control if they trust AI. Let’s debunk that myth next.
AI Culling: Myth-Busting and Real-World Benefits
Common Misconception: "AI Will Ruin My Artistic Vision"
We know that AI photo culling is a new and innovative concept that may seem too good to be true. Even world renowned photographers have some reservations and hesitations about trusting an AI to cull your photos.
“They all suck!”
Says Vanessa Joy, Wedding Photographer
.gif?width=640&height=401&name=Vanessa_Joy_Meme%20(1).gif)
Real-World Advantages
The ideal photo culling software is one that prioritizes the photographer's role over AI, using AI merely as an assistant while leaving the final decisions to the photographer.
Modern AI-based software like FilterPixel gives full control to photographers over their images, its just an AI assistant that analyses images for aspects such as focus, exposure, and subject expression, compositions, moments, emotions, etc. It then groups duplicates and keep atleast one from every duplicate set for photographer's review.
You still retain the final say on which photos to keep. The AI simply does the heavy lifting—much like a seasoned studio assistant
AI culling speeds up the slog of repetitive checks, minimizing human error and decision fatigue. Unlike older tools that rely on local hardware limitations, some AI solutions leverage cloud GPU servers for lightning-fast processing—even on massive RAW files. That means you can handle a big wedding shoot overnight and wake up to a curated set of potential keepers, ready for your personal review.
In short: AI culling frees you to fine-tune critical artistic decisions, rather than slogging through every near-duplicate image.
FilterPixel: The Next Generation of Culling Software
If you’ve experimented with older solutions or even with other AI tools, you’ll notice FilterPixel takes the culling experience to an entirely new level. The software is designed for both speed and precision, leveraging advanced AI algorithms to handle large volumes of RAW images without melting your CPU.
Key Highlights of FilterPixel
Cloud-Based
FilterPixel uses high-performance cloud servers to process your images & improve your selections over time. If you prefer not to share data with Filterpixel to improve your AI, you can switch it off in the app.
Fact: A cloud based workflow can sort & edit photos 3-5X faster than a workflow that processes photos offline. Check how a cloud based system can take care of your privacy.
Intuitive Grouping
The software groups duplicates, near-identical sequences, and subpar images, then flags the best shots in each group. You no longer have to flip through 10 frames of the same pose—FilterPixel narrows it down automatically.
Customizable Strictness
You can fine-tune how harsh (or lenient) the AI should be regarding slight motion blur or accidental blinks. This level of customization keeps you in the driver’s seat, ensuring the final picks align with your creative style.

Consistent Results
Unlike manual culling, which can fluctuate with your mood or fatigue level, FilterPixel applies consistent quality benchmarks across the entire shoot. You can always override the AI, of course, but this consistent baseline keeps your workflow efficient.
A Step-by-Step Workflow for Faster Photo Culling
Below is a balanced approach that merges best practices from top professionals with the efficiency of AI software—particularly FilterPixel.
-
Backup and Sort
- Save your RAW files to two different drives or a drive + cloud combo for security. Organize them in folders labeled by date, event, and client name.
-
Import into FilterPixel
- Once your files are secured, drag them into FilterPixel. The software will quickly group images based on similarities and detect glaring issues such as blurriness or closed eyes.
-
Choose Your AI Settings
- Decide how strict or lenient you want the AI to be. If you’re shooting weddings, you might allow for slight motion blur in emotional moments, whereas product photography might demand near-perfect focus.
-
Preliminary Cull
- Let FilterPixel identify the no-gos: majorly out-of-focus images, extreme under/overexposures, or accidental shots. This automatic removal can slash your workload by half or more.
-
Review & Override
- Take a quick pass through the AI’s selections. If you spot a borderline shot that you love—maybe it’s not tack-sharp, but the expression is priceless—keep it in. Conversely, you can reject an AI-selected shot if you feel it doesn’t meet your creative standard.
-
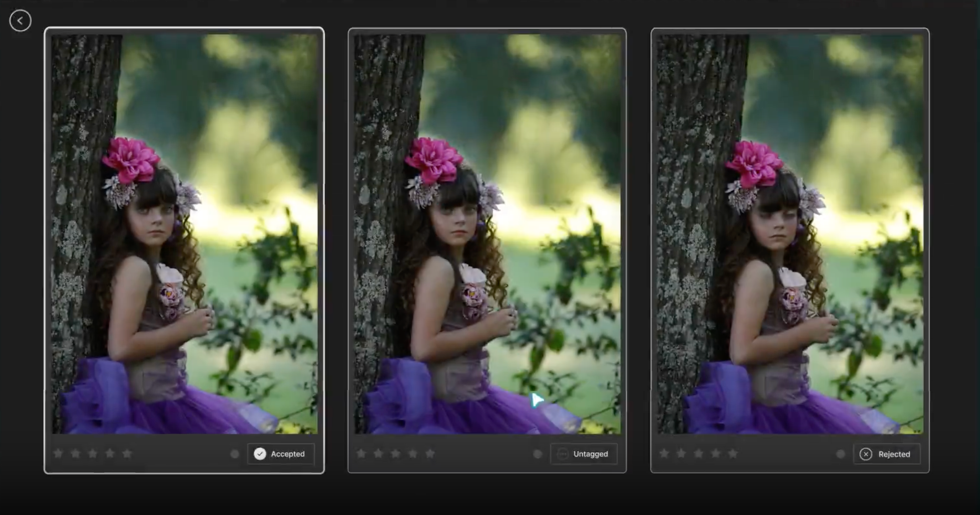
Apply Ratings or Color Codes
- Mark your final keepers with star or color tags (e.g., five-star for must-have images, three-star for decent backups). This step ensures a smooth transition into editing software like Lightroom or Capture One.
-
Export for Editing
- Send your curated picks into your chosen editing platform. Because you’ve already weeded out the fluff, the editing stage feels far less overwhelming.
Strategies for a Refined (and Faster) Culling Routine
Create a Consistent Culling Ritual
Develop a routine that you can apply to each shoot. For instance, always cull your images the same day or morning after the event, while the memories are still fresh in your mind. This habit stops culling from becoming a dreaded, postponed task.
Focus on the Emotion First
When scanning a set—especially in wedding or portrait photography—zero in on emotional resonance before dissecting technicalities. AI culling software, including FilterPixel, is adept at removing obvious mistakes, but your human eye can catch intangible moments that truly define the shoot.
Utilize Metadata
Embedding quick metadata (e.g., location, client name, event type) early on can save time when you revisit these photos months or years later. It also helps you quickly filter images for specialized blog posts or marketing campaigns.
Consider Batch Culling Multiple Shoots
If you have back-to-back events, stack them up and let the AI do its preliminary pass overnight. By morning, you’ll be reviewing culls for multiple shoots at once, a huge time-saver for high-volume photographers.
Frequently Asked Questions
Q: Will AI culling eliminate my creative touch?
A: Not at all. AI-based solutions like FilterPixel handle technical filtering—blurs, duplicates, subpar exposures. You retain full control to override any decision. Think of it as having a dedicated assistant who does the grunt work while you curate the final gallery.
Q: How many photos do I realistically need to deliver to clients?
A: This varies by niche. Wedding photographers might deliver 400–800 final images from 2,000+ captured, while event or portrait photographers might keep a smaller ratio. In any case, culling ensures those delivered images are consistently strong.
Q: Is FilterPixel only for wedding or event photographers?
A: No. Any niche that yields large image volumes—sports, wildlife, portraits—can benefit. FilterPixel’s advanced AI suits any scenario where you’d otherwise waste time reviewing near-duplicates.
Q: Do I need a high-end computer to run FilterPixel?
A: Cloud-based GPU processing allows FilterPixel to handle large RAW files without overloading your computer. So, you don't need a high-end system to use Filterpixel.
Conclusion: Embrace the Future of Photo Culling
Gone are the days when culling is little more than an endless, mind-numbing chore. With the rise of intuitive AI solutions like FilterPixel, you can:
- Trim thousands of shots to a refined, compelling gallery
- Optimize your workflow to preserve energy for creative editing
- Deliver final images to clients sooner, earning you rave reviews and potential referrals
Culling isn’t just about discarding unwanted images; it’s a fundamental stage in your post-processing pipeline that shapes the story your photos tell. By automating the repetitive tasks and focusing on your artistic vision, you’ll reclaim valuable hours that can be channeled into growing your photography brand or simply enjoying more downtime.
Ready to Transform Your Workflow?
Elevate your approach to Photo Culling with FilterPixel—the cutting-edge AI software designed to help you gain a competitive edge in speed and quality.
Claim Your Free Trial of FilterPixel Now and experience firsthand how AI-driven culling can revolutionize your post-shoot routine. It’s time to do less busywork and more of what you love: capturing unforgettable images and delivering them with a flourish.
.png)
.png)